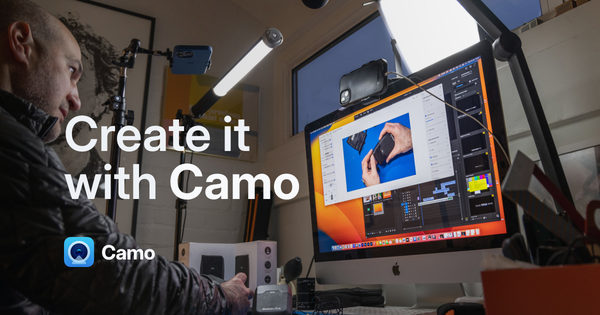
Getting started with Camo is easy, and just a few steps will take you from initial download to meeting, recording or streaming with better video using your webcam and/or other connected cameras. If you’re using your phone as your camera, you’ll also need to get the Camo Camera app on your iOS or Android device. To help, here’s a step-by-step guide through each process.
Installing Camo Studio on your PC or Mac
The first step is to get Camo Studio set up on your computer:
Installing on Windows
You can get Camo Studio from the Microsoft Store, or download it directly and double-click the installer in your Downloads folder to get the app set up on your Windows PC.
Next, open Camo Studio and run through the onboarding. This will guide you through some of the app’s functionality and ask you to install the compatibility add-on if you haven’t already.
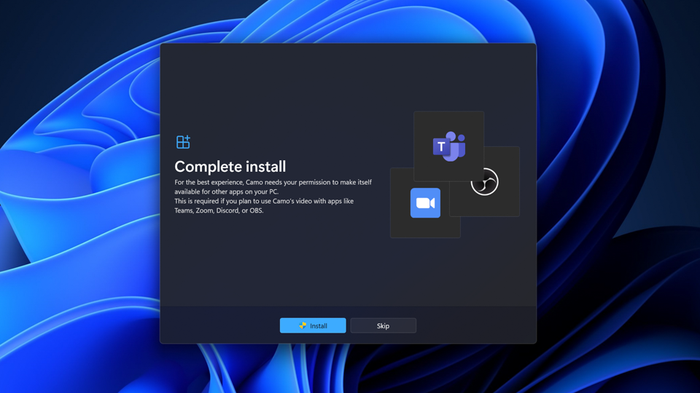
Camo Studio prompting to grant compatibility permissions on Windows
Now that Camo Studio is ready, the next step is connecting to your built-in camera, webcam, phone, DSLR or mirrorless camera.
Installing on macOS
Download Camo Studio for macOS if you haven't already. Open the downloaded file and drag the Camo Studio icon into your Applications folder — no admin password needed for this step.
The first time you open Camo Studio, you'll be offered the option to install a camera extension and audio plugin — this is what lets other apps (like Zoom or OBS) see and use Camo's video and audio. You can install these during onboarding, or skip them and install them later; just note that other apps won't be able to use Camo until you do. Installing the audio plugin will prompt for your admin password; installing the camera extension will ask you to approve it in System Settings.
Now, you’re ready to start connecting camera devices.
Connecting your devices to Camo Studio
Camo works with essentially any camera device you can connect to your computer, and can even pair wirelessly with your iPhone or Android device:
- Using Camo with a webcam
- Using Camo with a DSLR or mirrorless camera
- Using Camo with an iPhone
- Using Camo with an Android device
Using Camo with a webcam
Once you’ve installed Camo Studio on your computer, any built-in cameras should be detected automatically by the app and appear in the "Device" dropdown menu under the video tab in the upper left of the Camo Studio interface. Webcams connected by USB will also appear here. To start using your webcam, simply select it in the dropdown – you should see a live preview of its video feed appear in the centre of the window.
Using Camo with a DSLR or mirrorless camera
Camo supports both mirrorless and DSLR cameras. Just note that you may have to first enable USB streaming on your device before you can select in Camo Studio. Once this is done, and you’ve connected the camera to your computer, it should appear in the Device pull-down under the video tab on the upper left of the interface.
Using Camo with an iPhone
To use the advanced camera on your iPhone with Camo Studio, you’ll need to download the iOS Camo Camera app from the App Store. You can also find it by simply searching for "camo". This also applies to iPads.
If you’ve downloaded the mobile app before the desktop app, you can send the Camo Studio link directly from Camo on your phone to your computer.
- To share from iOS to macOS, AirDrop the desktop app to your Mac by tapping the AirDrop icon on the Getting Started screen.
- To share to Windows, tap
Send Linkfrom the Getting Started screen.
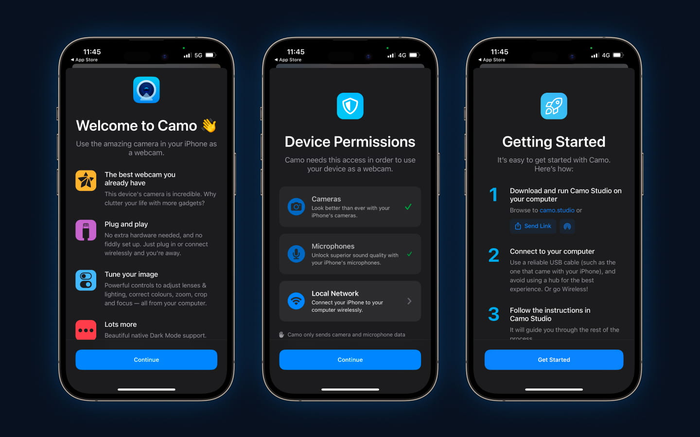
Follow the installer instructions to get setup on iOS
You can connect Camo Camera on your iPhone to Camo Studio via either Wi-Fi or USB. For the first session, we recommend pairing over USB, as it offers the lowest video latency and most stable connection. You can find out more about the trade-offs between Wi-Fi and USB connections.
Connecting Camo on iOS over USB
Connecting your iPhone to Camo Studio over USB is automatic on both macOS and Windows. Just plug your device into your computer using a standard Lightning or USB-C cable. After a couple seconds, you should see video from your device appear in Camo Studio.
Connecting Camo on iOS over Wi-Fi
Connecting your iPhone to Camo Studio over Wi-Fi is simple:
- Open the
Devicedropdown in the left sidebar and select+ Pair Camo Camera. This will open a pairing window displaying a QR code. - In Camo on your mobile device, tap the wireless connection button in the top-right and then scan the QR code displayed on your computer.
- Your devices should connect automatically and video from your mobile device should start streaming through to Camo Studio.
The minimum requirements for pairing over Wi-Fi on Apple devices is macOS Monterey (12.3) and iOS 15. All supported versions of Windows are compatible with Wi-Fi pairing.
If you encounter any issues pairing your devices via Wi-Fi, check out our handy troubleshooting tips or try connecting over USB instead.
Using Camo with an Android device
To use the camera on your Android device with Camo Studio, you’ll need to download the Camo Camera app from the Google Play Store. Or, you can find it by simply searching for "camo" on your device.
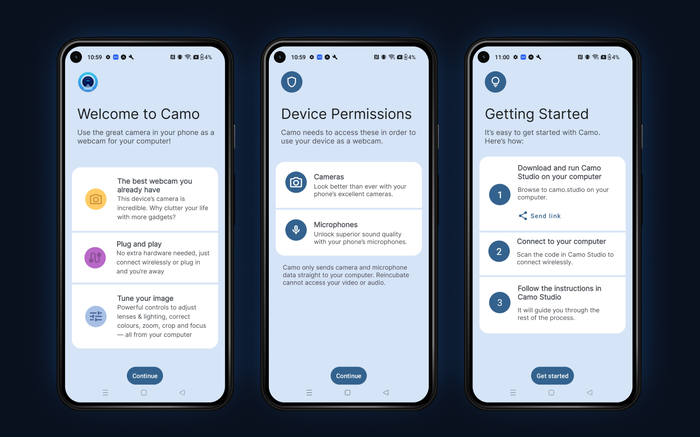
Getting Camo on your Android device
If you’ve downloaded the mobile app before the desktop app, you can send the Camo Studio link directly from Camo on your phone to your computer. Just tap Send Link from the Getting Started screen.
You can connect your Android device to Camo Studio via either Wi-Fi or USB. For the first session, we recommend doing so over USB, as it offers the lowest video latency and most stable connection. You can find out more about the trade-offs between Wi-Fi and USB connections.
Connecting your Android device to Camo Studio over USB
The steps for connecting your Android differ depending on whether you’re using Windows PC or a Mac.
On a Mac, your Android should connect automatically over USB. If you’ve previously paired it with a computer running Windows, make sure USB debugging is turned off by searching for Developer Options → USB debugging and unticking it.
To connect Android to Camo Studio on Windows, you’ll need to turn on USB debugging. The instructions to do this vary slightly depending on the Android phone you’re using. We’ve outlined the process below using a OnePlus Nord 2.
If you need help turning on USB debugging for your Android device please contact us and we’ll walk you through the process for your specific phone.
To turn on USB debugging:
- Connect your phone to your computer and open Camo Studio. The interface should display a set of instructions similar to the ones below.
- Follow these steps on your Android to configure your device:
- Go to
Settings, search forBuild numberand tap it 7 times. - Now search for
Developer OptionsinSettings, scroll down toUSB debuggingand tick to turn it on. - If you’re prompted, selecting
Always allow from this computerwill mean that you will only need to do this once.
- Go to
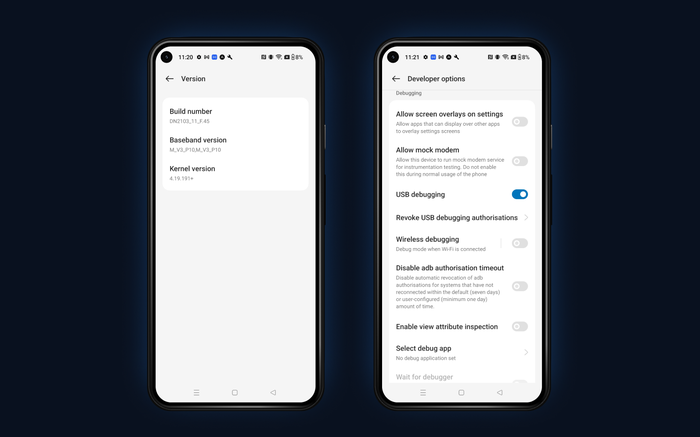
USB debugging on a OnePlus Nord 2 phone
If you are using an Android device and are looking to connect to a Windows computer, the easiest way to pair is via Wi-Fi as the process to pair through USB is more complex in this case.
Find out more about the trade-offs between Wi-Fi and USB connections.
Pairing your Android device to Camo Studio over Wi-Fi
Pairing your Android device with Camo Studio over Wi-Fi is simple:
- Open the
Devicedropdown in the left sidebar and select+ Pair Camo Camera. This will open a pairing window displaying a QR code. - In the Camo Camera app on your mobile device, tap the wireless connection button in the top-right and then scan the QR code displayed on your computer.
- Your devices should connect automatically and video from your mobile device should start streaming through to Camo Studio.
The minimum requirements for pairing over Wi-Fi on an Apple computer is macOS Monterey (12.3). All supported versions of Windows and Android are compatible with Wi-Fi pairing.
If you encounter any issues connecting your devices via Wi-Fi, check out our handy troubleshooting tips or try connecting over USB.
Using Camo’s video
Once you’ve connected your device and see its picture in the Camo interface, it’s easy to refine and customise its picture, make a recording, or connect to any video meeting platform. Here’s how you can jump right in:
Instant improvements
We encourage you to try out every Camo feature, but if you’re looking for some great results quickly, your first stop should be the Scenes panel on the right side of the interface. There you'll find a range of default scenes designed to give your video an instant look for a variety of use cases. For a scene that will help you stand out in your next video meeting, select Meet & Greet. It will immediately soften your background with Portrait Mode, add a bit of lighting correction with Spotlight, and apply your name and details to the upper left of the frame. To refine it even further, here are a few other steps to take:
- Correct your camera's colour temperature by using the White balance control under the Video tab in the upper left.
- Adjust your colours with the Saturation and Vibrance sliders under the same tab. Vibrance is an especially helpful tool for boosting colour while keeping your face looking natural.
- Swap in your own logo under the Layers tab in the upper left by deleting the deleting or hiding the default icon, and clicking the '+' symbol to import your own image file.
- Finally, tighten up your shot with the Framing tool found under the video tab.
Combining a few small changes in Camo Studio can make an instant difference to your video
Selecting a video profile
Choosing the best resolution and frame rate for your video can be complicated. To get you started quickly, you'll find a range of presets in the video profiles at the top of the interface, named according to typical use cases. Once you've selected the one that corresponds to your video, you're ready to meet or record.
Connecting to meeting platforms
If you’d like to use Camo for your work meetings and presentations, simply open your video conferencing app of choice and select Camo Camera in its video settings. You can also select Camo as an audio source, either to use the microphone on your connected phone or camera as an input, or to let the app help keep your audio and video in sync.
Recording your first video
Recording with Camo works the same with both macOS and Windows. Just click on the Record button in the top bar of the Camo Studio interface, and Camo will begin capturing video to whichever location you’ve designated in the Settings>General>Recording save location. When you’re finished with the take, clicking the same button will end the recording and save the file.
With just one click, you’re recording with Camo
When you have the chance, we encourage you to explore Camo’s capabilities more thoroughly in this manual. We’ve also created a series of guides that can help you improve your video even further. You’ll get tips for capturing better audio, improving your lighting, making better eye contact, mounting your phone, and more.
Upgrading to Camo Pro
There’s no need to pay to use Camo, and the free edition provides everything you need to use your phone as a high-quality webcam. However, if you’d like to go pro and take full advantage of your devices 4K resolution, you can upgrade by clicking the "Upgrade" button on the top-right of Camo Studio.
That’ll show a window like the following, with buttons at the bottom to buy or activate a license. Clicking "Buy now" will take you to Camo’s checkout to purchase a license.
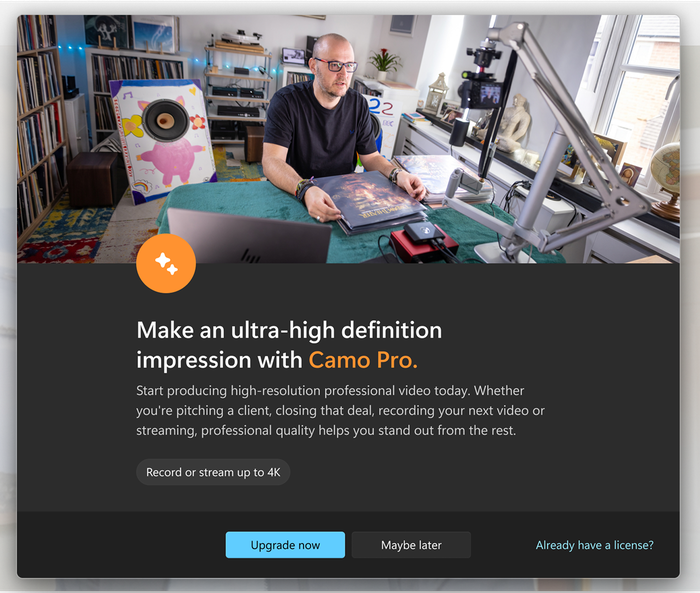
Camo Studio’s upgrade window
Once you’ve bought Camo, you’ll receive an email with instructions on how to activate your account. To activate Camo using previously set account details, in Camo Studio go to Upgrade and select Activate license, and enter use your account credentials to authenticate.
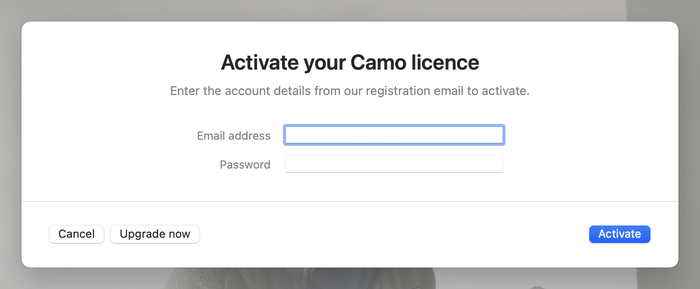
Camo Studio prompting for license details
If you’ve closed the browser window you used to buy Camo, and you can’t find the email, search for support@reincubate.com in your inbox and check your spam. Contact us if you get stuck or need help!